Saturday, 12 November 2016

Load testing on single server

Image result for load testing

Application: w3wp.exe
Framework Version: v4.0.30319
Description: The process was terminated due to an unhandled exception.
Exception Info: System.AccessViolationException
   at System.Threading.Thread.InternalCrossContextCallback(System.Runtime.Remoting.Contexts.Context, IntPtr, Int32, System.Threading.InternalCrossContextDelegate, System.Object[])
   at System.Runtime.Remoting.Channels.CrossContextChannel.SyncProcessMessage(System.Runtime.Remoting.Messaging.IMessage)
   at System.Runtime.Remoting.Proxies.RemotingProxy.CallProcessMessage(System.Runtime.Remoting.Messaging.IMessageSink, System.Runtime.Remoting.Messaging.IMessage, System.Runtime.Remoting.Contexts.ArrayWithSize, System.Threading.Thread, System.Runtime.Remoting.Contexts.Context, Boolean)
   at System.Runtime.Remoting.Proxies.RemotingProxy.InternalInvoke(System.Runtime.Remoting.Messaging.IMethodCallMessage, Boolean, Int32)
   at System.Runtime.Remoting.Proxies.RealProxy.PrivateInvoke(System.Runtime.Remoting.Proxies.MessageData ByRef, Int32)
   at .....followed by application exception 

When I was running my load tests using JMeter against a single server (usually against a load balancer but for some reason wanted to know the)I happened to get this weird error repeatedly with 100% error rate in Jmeter. The application I was testing was a WCF service hosted on IIS.

My first instinct was to check if the error had occurred because of my recent changes, I checked the event viewer which told me that this error was occurring very rarely.

It took a lot of googling and ended up with nothing, so I decided to check on the IIS 7 configuration.

I found the root cause of the failure, it was due to few configurations that had to be changed in IIS.


Configuration:

IIS Queue Length: The default value is 1000, so after 1000 active connections any new connections will be served a 503 Error.

IIS rapid fail protection: By default the value is set as true. So after 5 application errors, the app pool goes down.

To sum it up, since I ran the load test for 'n' Users. The default IIS Queue size is overloaded with many requests crossing the default 1000 queue size which returns application errors our and the other config “Rapid Fail Protection” pulls down the app pool.

This error has occurred only because I load tested on a single server with a connection limit of 1000 in the IIS.

I increased the queue size to the max value of 9000 and disabled the Rapid Fail Protection and Ran the same LOAD TEST. It FIXED the problem and worked well as I saw a error rate of less than 0.3% for a very large sample and the above error never occurred again. Turns out it only occurred because I ran the load test against a single server. But it did point out to me that all the servers had a default value of 1000 Queue size and in case of an actual load all the servers would have gone crashing down. 

So to conclude the above error was a memory error I believe. If you faced the same error please post below on what you did to fix it.
Here are the configurations for IIS 7.0 as suggested by Microsoft. Be careful in whatever you need for your application, not all is good for you.

Monday, 7 November 2016

SoapUI hosting on Tomcat error

06-Nov-2016 14:18:34.624 SEVERE [http-nio-9092-exec-2] org.apache.catalina.core.ApplicationContext.log StandardWrapper.Throwable
 java.lang.NoClassDefFoundError: Could not initialize class com.eviware.soapui.impl.wsdl.support.http.HttpClientSupport
at com.eviware.soapui.DefaultSoapUICore.initSettings(DefaultSoapUICore.java:361)
at com.eviware.soapui.DefaultSoapUICore.init(DefaultSoapUICore.java:129)
at com.eviware.soapui.DefaultSoapUICore.<init>(DefaultSoapUICore.java:114)
at com.eviware.soapui.mockaswar.MockAsWarServlet$MockServletSoapUICore.<init>(MockAsWarServlet.java:317)
at com.eviware.soapui.mockaswar.MockAsWarServlet.init(MockAsWarServlet.java:71)
at javax.servlet.GenericServlet.init(GenericServlet.java:158)
at org.apache.catalina.core.StandardWrapper.initServlet(StandardWrapper.java:1183)
at org.apache.catalina.core.StandardWrapper.loadServlet(StandardWrapper.java:1099)
at org.apache.catalina.core.StandardWrapper.allocate(StandardWrapper.java:779)
at org.apache.catalina.core.StandardWrapperValve.invoke(StandardWrapperValve.java:133)
at org.apache.catalina.core.StandardContextValve.invoke(StandardContextValve.java:108)
at org.apache.catalina.authenticator.AuthenticatorBase.invoke(AuthenticatorBase.java:472)
at org.apache.catalina.core.StandardHostValve.invoke(StandardHostValve.java:140)
at org.apache.catalina.valves.ErrorReportValve.invoke(ErrorReportValve.java:79)
at org.apache.catalina.valves.AbstractAccessLogValve.invoke(AbstractAccessLogValve.java:620)
at org.apache.catalina.core.StandardEngineValve.invoke(StandardEngineValve.java:87)
at org.apache.catalina.connector.CoyoteAdapter.service(CoyoteAdapter.java:349)
at org.apache.coyote.http11.Http11Processor.service(Http11Processor.java:784)
at org.apache.coyote.AbstractProcessorLight.process(AbstractProcessorLight.java:66)
at org.apache.coyote.AbstractProtocol$ConnectionHandler.process(AbstractProtocol.java:802)
at org.apache.tomcat.util.net.NioEndpoint$SocketProcessor.doRun(NioEndpoint.java:1410)
at org.apache.tomcat.util.net.SocketProcessorBase.run(SocketProcessorBase.java:49)
at java.util.concurrent.ThreadPoolExecutor.runWorker(Unknown Source)
at java.util.concurrent.ThreadPoolExecutor$Worker.run(Unknown Source)
at org.apache.tomcat.util.threads.TaskThread$WrappingRunnable.run(TaskThread.java:61)
at java.lang.Thread.run(Unknown Source)

This is the error I happened to get on SOAPUI 5.2.1 on trying to deploy a war file containing mock service on Apache Tomcat 8.5.

This issue is caused because the hosting service is unable to find some jar files required to host the service. This can be FIXed by ensuring soapUI has internet access. Once I ran this on a system having internet access, it worked fine.

If you have a system without internet access, you can use the SOAPUI itself to host the mock service and disable logging, it is good enough to run a Load Test on it. Response time I saw was 0.1ms . 

Friday, 4 November 2016

Managing VirtualBox Better

Image result for oracle virtualbox icon
Getting the better out of the painful VM – Virtual Box

After struggling a long time with VM with slow speed and frequent crashes. I found few tips from various websites which helps the VM run in a better way.
This post contains the following.

  • ·         Tweaks for a better VM
  • ·         Installing Ubuntu or any other Linux/OS on Oraclebox.
  • ·         Misc


Below are a few tweaks that can be done to prevent VM from getting crashed and to make it perform better.

(It would be better if you have the fresh vmdk file before applying the following settings.)

Go to
machine-> settings-System.

Set Base Memory to the max green level.

Switch to Processor Tab

Set the CPU as 2 or the green level.
Set the execution Cap below it to 100%

Switch to Acceleration Tab
Set  both Option in Hardware Virtualization to checked.

Go to Display
set Video memory to 128 mb in the video tab


Other things to do:

  • ·         Take a snapshot of the fresh install (initial install) – You can restore to any previous snapshot and prevent the loss of your entire vm
  • ·         Run Disk Defragmenter every week on your VM.
  • ·         Save the machine state, do not shutdown everytime.
  • ·         Always choose fixed disk size to prevent space and performance issues.


In case of network issues:

Go to machine -> settings -> Network
Change Adapter 1 to Attached to : Bridged  (works sometimes- this is due to network issues.)

Installing a linux VM on your own.

Download Ubuntu or any linux distro iso file .

http://linuxlookup.com/linux_iso


· Start VMware.

· From the File menu select "Create a New Virtual Machine"

· Choose to install the operating system later. Click "Next".

· Select Linux as the "Guest Operating System" and then choose Ubuntu as the "Version". Click "next".

· Provide a "Virtual machine name" and "Location" where the machine will be stored on the Windows host. The defaults are fine here. Click "Next".

· For "Maximum disk size (GB)" it is good to start with 40G if possible. This means that it will take up 40G on the Windows host. Make sure that the Windows host has at least this much before proceeding. It is also a good practice to tell VMware to split the virtual disk into 2G files. This will makes the image easier to copy and transport if necessary. Click "Next".

· Click "Finish" to complete the creation of the virtual machine.

  • settings -> Storage -> Select the disk Icon

  • On the right select Attributes browse the ISO you downloaded.Click OK.

  • Now boot up Ubuntu VM ware - install normally like you do any OS installation.

  • After installation, you will be prompted for reboot. 

  • Go to Machine ->Settings -> Storage -> Select the disk Icon

  • On the right select Attributes Disk image and select remove the iso.

  • Now boot up your VM again. You can use Ubuntu .


MISC:
Cloning:
When you want to clone the VMDK file. (Time consuming, do not do it unless extremely necessary)
Grouping Boxes:
Group -> group (for better classification)


Wednesday, 12 October 2016

JMeter Memory error

As I was running a load test on an WCF service for the first time with JMeter, once the samples reached 30k the JMeter UI froze up and I had to close JMeter abruptly. I happened to check on the JMeter logs and found that this was the last entry
jmeter.threads.JMeterThread: Test failed! java.lang.OutOfMemoryError: Java heap space

As usual I turned to google and found out that this error can be forgone by increasing the Java heap space.

This line in  jmeter.bat or jmeter.sh script which tells the launching instance of JMeter how much heap size it should use. 

JVM_ARGS="-Xms512m -Xmx512m" jmeter.sh

I changed it to -Xms1024m at both places and relaunched JMeter.  (Please Note that your system that has JMeter setup has sufficient RAM )

It FIXed the problem. 

I am able to test the application now, crossing the previous 30k sample and going beyond till I stop the test manually.

Also I found the below article with a couple of more fixes that you might need in case you are facing the above error still.

Thursday, 1 September 2016

The decoration of objects

This is an image of tree rings. As you know the rings indicate the age of the tree. 

Now coming to our example of Decorator pattern, the "first year of growth is our original object and the rest of the rings are the decorators"


Decorator pattern is used as an alternative for subclassing when we need the functionality to be extended. It is also an example of the Open- Closed Principle where we are allowed only to extend instead of modify.

When do we used decorator pattern?
When we have a set of large combination of two or more different sets of logic to be performed, instead of having a nightmare of derived classes we would rather bind the required logic dynamically.

Consider a web cam device that rotates and takes a photo everytime it senses motion of object in front of it.

Pseudo Code

InstructionCode  ActionPerformed
CC                         Check if device is awake/Powered on

SS                          Check if sensor is functional

TT                          Take a snapshot

RR                          Rotate towards object of movement

DD                          Detect motion

MM                        TimerControl

Scenario 1:
The workflow will be such as

CC- Check if device is awake  >>  SS- Check if sensor is functional  >> DD- Detect Motion  >> RR- Rotate towards motion >> TT - Take Snapshot.


So the code you would need to write would be
CC SS DD RR TT

Scenario 2:
Now if the functionality of the device is changed to take pictures at every interval of time.

The workflow will be

CC- Check if device is awake >> MM- Timer Control >> TT- Take Snapshot.

So the code you would need to write would be
CC MM TT

If you considered the above scenario writing without a decorator pattern and having derived classes etc, it would have taken a lot of time modifying the codebase to fit in scenario 2 and violating the open closed principle of SOLID. Instead on using decorator we leave the scenrario 1  code untouched while we implement the scenario 2 logic.

In the above example we have limited number of instructions, consider writing a code for a IOT device which has numerous instruction sets all that need to be constructed to interact with a device. In such a scenario you would definitely prefer writing less code and opt for decorator pattern.

Below is a basic code example of an Ice Cream Preparation using decorator pattern.

Image result for ice cream toppings display

The Ice Cream comes with a base Cone and with one scoop of ice cream.
It can be topped with chocolate sauce, sprinkles, gummy bears or all the above.

using System;

namespace IceCreamDecoration
{
    public abstract class BaseCone
    {
        protected double myPrice;

        public virtual double GetPrice()
        {
            return this.myPrice;
        }
    }

    public abstract class IceCreamToppingsDecorator : BaseCone
    {
        protected BaseCone basecone;
        public IceCreamToppingsDecorator(BaseCone baseconeToDecorate)
        {
            this.basecone = baseconeToDecorate;
        }

        public override double GetPrice()
        {
            return (this.basecone.GetPrice() + this.myPrice);
        }
    }

    class Program
    {
        
        static void Main()
        {
          
            OneScoop basecone = new OneScoop();
            Console.WriteLine("Just one scoop : " + basecone.GetPrice().ToString());

            SprinklesTopping sprinkles = new SprinklesTopping(basecone);
            SprinklesTopping moresprinkles = new SprinklesTopping(sprinkles);
            Console.WriteLine("single scoup with sprinkles: " + moresprinkles.GetPrice().ToString());

            GummyBearsTopping gummyBears = new GummyBearsTopping(moresprinkles);
            Console.WriteLine("single scoup with more sprinkles and gummy bears: " + gummyBears.GetPrice().ToString());

            ChocolateSauceTopping chocolateSauce = new ChocolateSauceTopping(gummyBears);
            Console.WriteLine("single scoup with more sprinkles and gummy bears and chocolate sauce: " + chocolateSauce.GetPrice().ToString());

            Console.ReadLine();
        }
    }

    public class OneScoop : BaseCone
    {
        public OneScoop()
        {
            this.myPrice = 6.99;
        }
    }

    public class Dessert : BaseCone
    {
        public Dessert()
        {
            this.myPrice = 7.49;
        }
    }

    public class SprinklesTopping : IceCreamToppingsDecorator
    {
        public SprinklesTopping(BaseCone baseconeToDecorate)
            : base(baseconeToDecorate)
        {
            this.myPrice = 0.99;
        }
    }

    public class GummyBearsTopping : IceCreamToppingsDecorator
    {
        public GummyBearsTopping(BaseCone baseconeToDecorate)
            : base(baseconeToDecorate)
        {
            this.myPrice = 1.49;
        }
    }

    public class ChocolateSauceTopping : IceCreamToppingsDecorator
    {
        public ChocolateSauceTopping(BaseCone baseconeToDecorate)
            : base(baseconeToDecorate)
        {
            this.myPrice = 2.49;
        }
    }
}

Tuesday, 16 August 2016

Setting up OTP Auth for your application with Google Auth

Cover art
Two factor authentication has become a necessary evil these days. Unlike the olden days where people carried a RSA token generator with them, these days we use apps such as Google Authenticator.

Below are the steps for helping you get started with it.

1. Get nugget package GoogleAuthenticator

2. Add the following code

     TwoFactorAuthenticator tfa = new TwoFactorAuthenticator();
     var setupCode = tfa.GenerateSetupCode("issuer", "accountTitle", "poiuytrewq123456", 300, 300);

            string qrCodeImageUrl = setupCode.QrCodeSetupImageUrl;
            string manualEntrySetupCode = setupCode.ManualEntryKey;
            Console.WriteLine(manualEntrySetupCode);

Use any key in place of "poiuytrewq123456"
On execution of this code you will get a Manual Entry Setup Code.

3. Install GoogleAuthenticator on your phone from Google Play.
Open App Goto
Options >> Setup Account >> Enter Provided Key >>  Enter the alphanumeric displayed by the above program and enter the same "accountTitle" given in the code above in the "Account Name" field.
Now your account is setup.

4. Add the following code to validate the OTP in your mobile.

            Console.WriteLine("Enter OTP ");
            string enteredOTP=Console.ReadLine();
          
            bool isCorrectPIN = tfa.ValidateTwoFactorPIN("poiuytrewq123456", enteredOTP);
            if (isCorrectPIN)
            {
                return true;
            }
            else
                return false;

That's it you are done.

Run the Program
Enter the OTP in the console as shown in your mobile.
If the OTP matches you will get authenticated.

Will share the Github repo link.


Thursday, 18 February 2016

Listing Dependencies of Stored Procedure in MS SQL

When you want to check the dependencies of a stored procedure as in which tables are being used,
you can use the below query

SELECT DISTINCT p.name AS proc_name, t.name AS table_name
FROM sys.sql_dependencies d 

INNER JOIN sys.tables     t ON t.object_id = d.referenced_major_id
INNER JOIN sys.procedures p ON p.object_id = d.object_id

ORDER BY proc_name, table_name

Below is the result on execution of the above query on the Northwind Database


You can also try

sp_depends Procedure_Name

Thursday, 7 January 2016

Console Application to Create and Read from Couchbase views

Creating a View

Log into Web Console

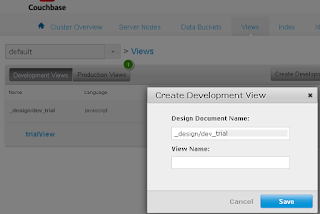
Go to Views - Development Views - Add View


Give a Design doc name and View Name can be anything.

In my case I will keep it as trial and trialView respectively.

Now Under Development Views you will find the view you have created

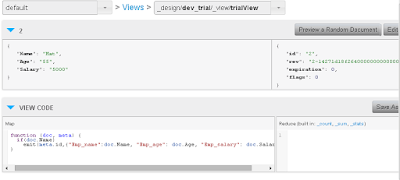
Click edit.


Here you can ignore the top row.
The View Code will contain the logic of your view. In sql terms , the select Query,

function (doc, meta) {
  if(doc.Name)
    emit(meta.id,{"Emp_name":doc.Name, "Emp_age": doc.Age, "Emp_salary": doc.Salary} );
}

This code checks if the documents have a property called name, if so it will return the name, age and salary. This query will be run on default DB.

The Reduce box to the right helps us with aggregate functions such as count , sum etc.

Once you have entered the MAP code hit SAVE

Go to Views page now.

 In development Views select PUBLISH against the VIEW you have CREATED.


Now to integrate it with the C# code

  private static void GetFromView()
        {
            using (var bucket = Cluster.OpenBucket())
            {
                var query = bucket.CreateQuery("trial", "trialView", false);  // trial is the Design Doc name and trialView is the View name

                var result = bucket.Query<Employee>(query);             // will be using the Employee POCO class defined below
                foreach (var row in result.Rows)
                {
                   // Console.WriteLine(row.Key+" "+row.Value);
                    Console.WriteLine(row.Key + " EmployeeName: " + row.Value.Name + " EmployeeAge:"+ row.Value.Age +" EmployeeSalary:"+ row.Value.Salary);
                }
            }


public class Employee
{
    [JsonProperty("Emp_name")]
    public string Name { get; set; }

    [JsonProperty("Emp_age")]
    public string Age { get; set; }

    [JsonProperty("Emp_salary")]
    public string Salary { get; set; }

}


Creating a Console Application for Couchbase CRUD operations

Here is a sample application for performing few CRUD operations.

Requirements: VS 2012

Steps:

Create a console Application and

1. GO to Tools > Library Package Manager > Package Console

2. Install-Package CouchbaseNetClient


Upsert - Insert new records or Update existing records


  private static void UpsertData()
        {
            using (var bucket = Cluster.OpenBucket())   // Opens "default" DB if DB name is not specified
            {
                var document = new Document<dynamic>
                {
                    Id = "Hello",
                    Content = new
                    {
                        name = "Couchbase"
                    }
                };                                                                  // Create Document/Row to be inserted

                var upsert = bucket.Upsert(document);
                if (upsert.Success)
                {
                    var get = bucket.GetDocument<dynamic>(document.Id);
                    document = get.Document;
                    var msg = string.Format("{0} {1}!", document.Id, document.Content.name);
                    Console.WriteLine(msg);
                }
  
            }
      

 private static void DeleteData()
        {
            using (var bucket = Cluster.OpenBucket())
            {
                var document = new Document<dynamic>
                {
                    Id = "Hello"

                };

                var get = bucket.GetDocument<dynamic>(document.Id);
                document = get.Document;
                var msg = string.Format("{0} {1}! Deleted", document.Id, document.Content.name);
                var remove = bucket.Remove(document); // Delete Document Using ID
                if (remove.Success)
                {
                  
                    Console.WriteLine(msg);
                }

            }
        }


Wednesday, 6 January 2016

Query Workbench Installation - N1QL - SQL type queries

Image result for n1ql
Query Workbench is when you want a SSMS / mysql client kinda interface.


  • Enables you to write queries like SQL queries. 
  • These queries are called N1QL queries pronounced as Nickel Queries

Download : 

  • Extract
  • Run the "Launch ..." bat file.
  • Command Window will popup saying Launching UI server, to use, point browser at 
  • http://localhost:8094Hit enter to stop server:
  • From Browser go to the address mentioned

Once you are done:

you can run SQL like queries ,

NOTE: if you are not able to see anything in Queryable Buckets on the left side then 

Type 
CREATE INDEX `beer-sample-type-index` ON `beer-sample`(type) USING GSI;

or

CREATE INDEX id_ix on `beer-sample`(meta().id);

These are diff types of indexes being set on beer-sample DB.

Also the DB name should be enclosed in BACK TICK and not single inverted commas


Sample N1QL queries: 


Installing and configuring Couchbase 3.0

For single Cluster
Step 1
Download couchbase from http://www.couchbase.com/nosql-databases/downloads

Step 2
After you run the MSI file your browser will open up with this page. Click on Setup to continue


Step 3
Here we need to Provide the path to Disk Storage - Change it if you want to else keep the same.

Ram Quota I have set it for 2 GB


In the same Page Below Select
Start New Cluster


Step 5

Then in the next page you will be asked to install sample Data buckets / Sample Tables


Select any one or both


Step 6

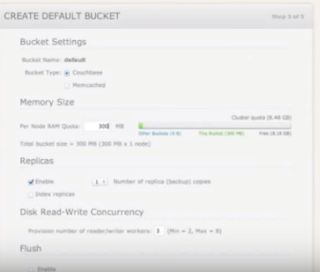
Create Default Bucket: this is your Default Database. Kinda like the Switch Statement DEFAULT functionality like when we dont define any DB name , the query will be executed in the default DB


Step 7
Just select I agree on terms and conditions


Step 8:
Choose Username and Password


Step 9:
Run the Couchbase console from Program Files of your system.


So here once you go to "Data Buckets" you will find the sample DB you installed along with the default DB.

In Server Nodes : You will have one Server i.e Local Host .
Cluster Overview  : will contain realtime self explanatory graphs

Views: They are similar to the views in SQL / relational DBs.
Index : consits of index ids of all the documents.
XDCR : Disaster recovery


SQL to Couchbase - Quick Reference/ Crash Course

Why Couchbase ? Why migrate from Relational ? For the SQL mind

short notes on Couchbase

Image result for couchbase sql funny


Terminologies

RDBMS           Couchbase/Nosql
Table                Collection/Bucket

Row                  Document

Column             Field

Relationships    Linking and Embedding Documents


Scalability: 
Since Data is consistently increasing , couchbase handles it well when compared to relationalDB


High Performance:
Data Retrieval is faster and data is rendered faster from queries preventing timeouts which is freq in SQL in case of large tables. 


24*365 Availability:
Whenever there is a schema change in SQL or something related to constraints etc we usually need downtime (not at all times) - In case of Couchbase there is no need for Downtime, schema changes can be dynamic. Thus making it a good choice for Agile apps.

Flexible DataModels:
Complex data types can be stored in JSON format - dataStructures such as lists, arrays , hash can be stored easily in JSON format. Think about how much time is saved by preventing the need to fill the LIST/Array from SQL DB in the code.


Architecture:

Consists Mainly of:


Data Manager: Consists Ramcache and the Storage Engine

Cluster Manager: uses Erlang (the same used in whatsapp Servers to manage load better)


Data Types Supported:

string, int, boolean, datetime, number, binary. (stored in base 64 format)

Complex Data types such as Arrays, Hashes, lists can be stored in JSON format

Schema changes can vary document to document i.e in SQL language it can vary from one row to another and can be done dynamically without dropping the existing table and data.


Storage Operations:

Data Stored in the form of Key Value - like hash

Data is stored in Ram Cache . ie. for Read or Write operation in the DB
the Ram Cache acts as the interface. Hence reducing the response time tremendously.
As disk Read / Write (i.e to the DB) takes more time.  For set/ write operation the data is always written to the Ram Cache and put into a Disk write Queue & Replication Queue.
In case of CacheMiss disk read occurs thru Ram Cache some latency will be there.